EWI, whole house
External Wall Insulation Sheffield: Insulating a Whole House
External wall insulation wraps the outside of a house in insulation boards and finishes them with render. It is the usual outside option for solid walls, which Approved Document L treats separately from walls suitable for cavity insulation, and the obvious time to consider it is when the house needs re-rendering anyway. On a whole house it changes more than the walls: everything fixed to them, and everything they meet at the eaves, sills and party lines, has to be thought through.

On this page
What goes onto the wall
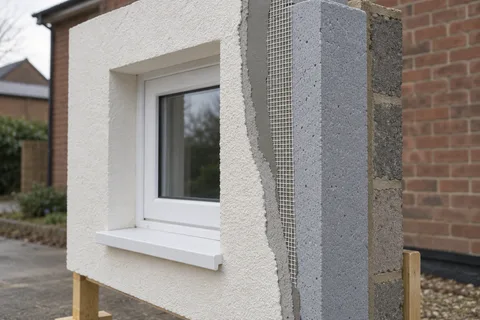
INCA's general guide to installation sets out the typical build-up. The existing wall is checked, repaired, cleaned and dried. A starter track matched to the board thickness is fixed above the damp-proof course. Insulation boards are bonded with a perimeter of adhesive plus central dabs, laid staggered with tight joints, and mechanically fixed to the manufacturer's pattern. Beads go on corners and edges, then a reinforcing base coat of about 6 mm with mesh lapped about 100 mm, with extra mesh patches at the corners of openings. Finally a primer and a render finish, often a silicone thin coat.
K Rend's HP14 data sheet shows the same logic from the render side: it can bed polystyrene boards onto masonry, with at least half of each board in contact and appropriate fixings, and it is the base coat for a thin-coat finish over insulation. Every manufacturer's own system instructions govern the details.
Survey the walls; repair defects and confirm the house suits EWI.
Take off downpipes, gas and electric boxes, lights and brackets; plan extended fixings.
Fix the starter track above the damp-proof course.
Bond and mechanically fix the insulation boards, staggered with tight joints.
Fit beads, then the meshed base coat with extra mesh at opening corners.
Prime and apply the finish; refit services, extend sills and close the eaves and verges.
- Existing wall Prepared; fittings removed and the base track fixed above ground level.
- Insulation boards Bonded with adhesive and, in most systems, mechanically fixed to the wall.
- Basecoat with mesh Reinforcement mesh embedded across the board joints and around openings.
- Primer Where the system requires it.
- Finish render A thin-coat finish that weatherproofs the insulation.
Wall on the left, finish on the right. Not to scale: coats, thicknesses and primers follow the chosen manufacturer’s system and the condition of the wall.
Eaves, sills, pipes and party walls
The added thickness moves the face of the wall outwards on every side of the house. Roof overhangs at the eaves and verges have to cover the new face, or be extended, so rain does not run behind the insulation. Window sills usually need extending so their drips stay clear of the new render, and reveals are insulated where there is room. Downpipes, soil stacks, gas meter boxes, outside lights and taps come off and go back on longer fixings.
On a semi or terrace, the insulation normally stops at the boundary, leaving a step between your wall and your neighbour's. Approved Document L's Appendix C asks for the technical risk and the effect of increased wall thickness on adjoining buildings to be assessed, and for condensation and moisture risk to be checked under Part C.
Part L, planning and older houses
Approved Document L treats re-rendering the outside of a wall as renovation. Where more than a quarter of the envelope is renovated, as on almost every whole-house re-render, the guidance expects the walls to be upgraded towards 0.30 where that is technically, functionally and economically feasible; its Table C1 lists an external insulation system with a rendered finish as a typical way of reaching it. Building control decides what is reasonable for your house.
Planning is separate. Under the householder permitted development rules, cladding any part of a house with render, timber, stone or tiles is not permitted development in conservation areas and National Parks, which covers many older Sheffield streets and, through the Peak District National Park, High and Low Bradfield. Approved Document L also says traditional solid walls of stone or lime should be improved only if it will not cause long-term deterioration, so a stone house may be better served by a different approach; see lime render for older walls.
Living with an insulated render
An insulated wall is softer behind the render than masonry, so fixings need care. A satellite dish, hanging basket or new light needs fixings designed for EWI rather than a plug driven through the render into the board. Keep the system details and the positions of any fixing pads.
The render itself is maintained like any thin coat: K Rend's advice is a gentle wash every few years and a biocide on damp walls. Ladders and scaffold resting on the face can dent it, so protect it when other trades work on the house. For the render-only alternative, see re-rendering the whole house.
Common questions
Does a whole-house re-render mean I have to add insulation?
Approved Document L expects renovated walls to be improved where it is technically, functionally and economically feasible, and a whole-house re-render usually triggers that test. Building control applies it to your house; conservation-area and traditional houses are treated more cautiously.
Can insulation stop at my neighbour's wall?
Usually it has to, which leaves a step at the boundary. The edge needs a designed closing detail, and the effect on the adjoining house should be assessed.
See housing and planning information for Sheffield and nearby places, including the source and geography behind each figure.