Silicone render, whole house
Silicone Render Sheffield: A Whole-House System
Silicone render is a ready-mixed thin-coat finish, bound with silicone and acrylic resins, applied over a cement-based base coat. Its appeal for a whole house is that it is through-coloured, repels water while letting vapour out, and contains a biocide against algae. On a whole house the interesting part is not the topcoat. It is getting the same finish to sit properly on several different backgrounds.

On this page
What the system is made of
K Rend's data sheet for its Silicone TC describes it as a resin render containing a silicone emulsion and an acrylic dispersion, with a biocide against moulds and algae. It is supplied as a paste and floated on only as thick as its largest grain: 1.5 mm for the TC15 grade and 3.0 mm for TC30, then rubbed up with a plastic float to form the texture. A grain that thin cannot hide an uneven wall, so all the flatness comes from what goes underneath.
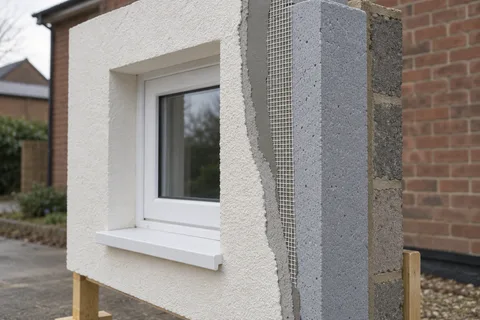
Underneath is a cement-based base coat with alkali-resistant glass-fibre mesh bedded into it. K Rend gives its HP14 base a nominal 4-6 mm. Before the topcoat, a coloured primer is rolled on and left 24 hours, and the data sheet asks for render base coats to be at least 14 days old first. That gives a typical order of base coat and mesh, wait, primer, wait, then finish.
- Sound background A background accepted by the specified system. Keeping old render requires a system-specific assessment of its bond and condition.
- Beads Corner, stop and base beads set the edges and straight lines.
- Basecoat with mesh Glass-fibre mesh embedded in the basecoat resists cracking.
- Primer Where the system requires it, tinted towards the finish colour.
- Silicone finish A thin, through-coloured, water-repellent coat that forms the texture.
Wall on the left, finish on the right. Not to scale: coats, thicknesses and primers follow the chosen manufacturer’s system and the condition of the wall.
Different backgrounds on the same house
A whole house rarely offers one background. The original walls may be common brick under old render, a later extension may be lightweight block, and a rear outrigger may still carry sound render that could stay. K Rend's product guide matches base coats to these: HP12 for dense backgrounds and unpainted render, used with its R7 primer where key is poor; HPX, with mesh, for lightweight block and high-suction brick; HP14 over insulation boards. The finish can be identical all the way round while the coat beneath changes from face to face.
Old render that stays has to be sound, clean and flat. If it is hollow when tapped or crazed across the face, it comes off, because a thin silicone coat will follow every crack and bulge in what lies under it. Painted render is a special case: the paint is part of the background, and a loose or chalky coat has to be removed before the base coat goes on.
Silicone is not the default for every Sheffield house. A solid stone house that relies on its walls drying outwards may be better served by lime; see lime rendering for older houses.
Applying it round the house
The finish coat is applied a face at a time. K Rend's data sheet asks for continuous surfaces to be completed without interruption, working to a wet edge, so each elevation is finished in one pass from one scaffold, with joins only at corners, beads or openings. A large gable needs a full gang on several lifts to keep the edge wet.
The same sheet sets the weather limits: at least 5C in the air and on the wall, no strong sun or wind, no damp or frozen backgrounds, and fresh render protected from rain and from drying too fast. On a whole-house job that means sheeting the scaffold on exposed faces and watching the forecast for each elevation, not just the first.
Strip failed render and repair the masonry on each elevation.
Fix beads: bell-cast at the damp-proof course, angle beads on corners, stop beads at frames and retained brick or stone.
Apply the base coat matched to each background, with mesh and extra patches at opening corners.
Leave the base coat at least 14 days, then apply the coloured primer and allow 24 hours.
Float and rub up the silicone finish one complete elevation at a time.
Refit fittings and downpipes on stainless brackets once the finish has hardened.
Colour, edges and aftercare
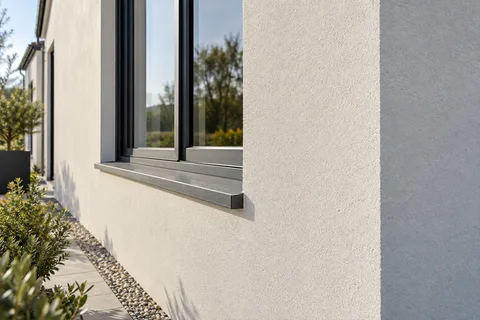
Choose the colour against the whole house: the roof, retained stone or brick, window frames and the neighbouring house on a semi. A test panel, which the data sheet recommends, should be viewed on more than one elevation, because a shade that suits a sunny front can look heavy on a shaded rear wall. Where the system meets retained brick or a neighbour's render, a stop bead gives a clean line.
K Rend describes its silicone finish as having a low susceptibility to soiling, but it is not maintenance-free. K Rend's maintenance advice is to wash render after a few years with a low-pressure fan nozzle and mild detergent, top to bottom, and to treat algae with a biocide on walls that stay damp, typically those near trees or facing north.
Common questions
How thick is silicone render?
The coloured finish is only as thick as its grain, 1.5 mm or 3.0 mm in K Rend's range. The base coat beneath does the levelling; K Rend gives its HP14 base a nominal 4-6 mm, and a wall that needs dubbing out first will be thicker.
Can silicone go over the existing render on part of the house?
Only where that render is sound, flat and clean. It is cleaned, primed and given a meshed base coat first. Hollow or cracked render is removed.
See housing and planning information for Sheffield and nearby places, including the source and geography behind each figure.